


AI
Revolutionizing Analytics with AI: Building a Digital Analytics Assistant with OpenAI's Assistants API
Mar 20, 2024
5 min read

Introduction
OpenAI's Assistants API represents a significant advancement in artificial intelligence, offering a robust framework for developers to build custom AI assistants. This API simplifies the integration of sophisticated AI functionalities into various applications, providing tools like Code Interpreter, Retrieval, and Function calling. In this blog post we will delve into the creation of an Open AI Assistant using Python, and how we can integrate it into our applications.
Step 0: Assistant architecture
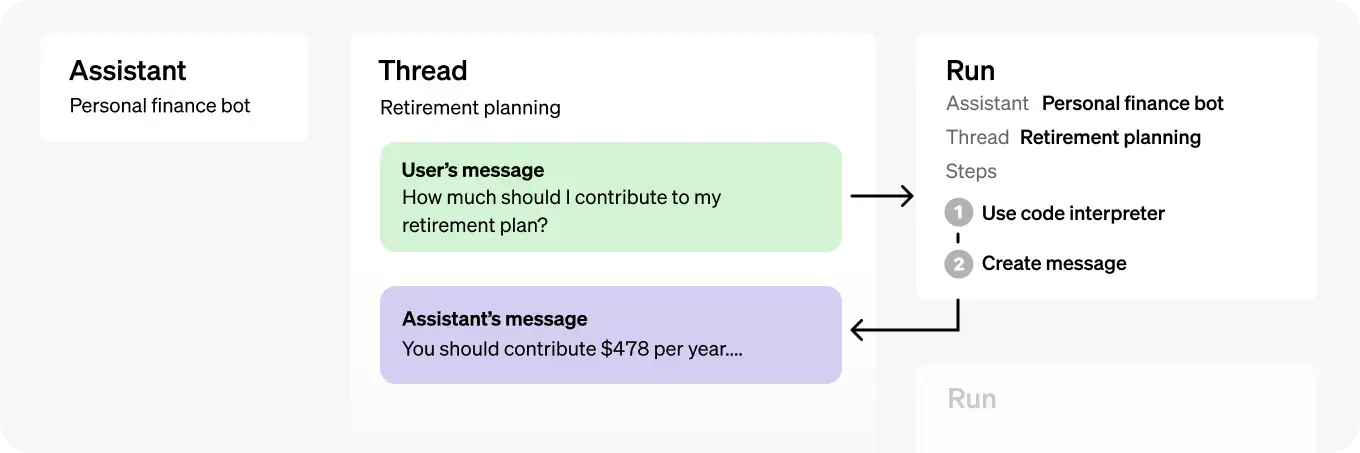
- Assistant: the base of our assistant that includes its custom instructions and the model. If helpful, enable tools like Code Interpreter, Retrieval, and Function calling.
- Thread: it represents the conversation between the user and the assistant
- Messages: the user input or assistant output
- Run: we run our Assistant on a given Thread to trigger responses. This can be done recurrently
Step 1: Creating an Assistant
The goal is to create a sophisticated digital analytics assistant, designed to provide insightful, actionable data analyses and reports specifically tailored for senior campaign management. As a user, we will provide the necessary files for the analysis and instruct on providing comments on specific KPIs.
Assistant Parameters:
- Instructions: how the Assistant and model should behave or respond
⇨ You are an advanced digital analytics assistant specializing in analyzing digital campaign data. Your role is to uncover insights and identify patterns in the provided data, delivering concise, insightful reports tailored for the Senior Manager of the Campaign Management department. Your analyses focus on driving strategic decisions, highlighting key performance metrics, and offering actionable recommendations for campaign optimization. - Model: you can specify any GPT-3.5 or GPT-4 models, including fine-tuned models
⇨ GPT-4 - Tools: the API supports Code Interpreter and Retrieval that are built and hosted by OpenAI.
⇨ Code Interpreter - Functions: the API allows you to define custom function signatures, with similar behavior as our function calling feature.
⇨ We won’t be using functions
We only need to create our assistant once, and then we can use it repeatedly for all our other tasks. There are two ways to create the assistant: by using the Playground or by utilizing the API.
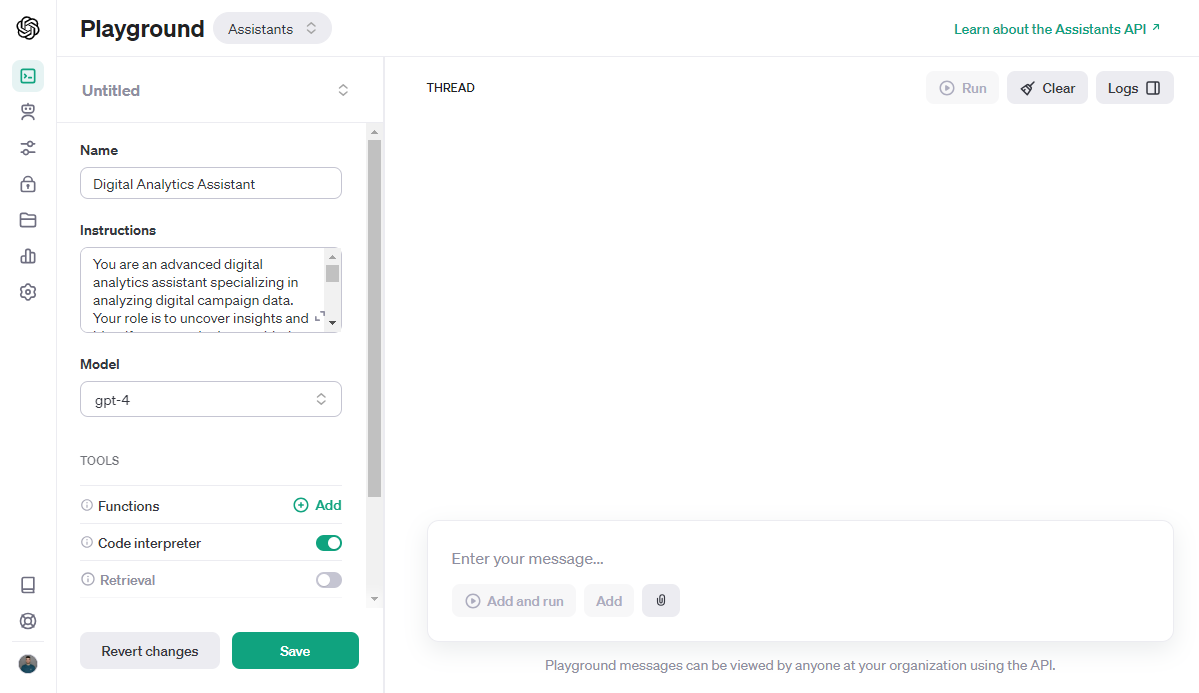
Option 1: Playground
Visit the playground here
You will have an empty list of fields to create your very first assistant, or the information of a previously created assistant will be displayed. To create a new one, click on the dropdown menu under the word 'Playground' and select 'Create assistant’
Fill in the appropriate information as follows:
Option 2: API
In this guide, we'll walk through the process of creating the assistant mentioned above using Python. Before we begin, ensure that you install the ‘openai’ python package.
The function openai.beta.assistants.create will return some important details (metadata) about our assistant, including its ID, as shown above.
You need to run this script only once. After that, we can access our assistant using its ID.
Step 2: Retrieving an Assistant
With just one line of code, we can retrieve the assistant we created, whether through the Playground or programmatically, and use it in our application.
Step 3: Upload a File
Since we need to use files with campaign data, we must upload them first!
With this straightforward code, we can upload a file from our local directory to OpenAI. You can view all your uploaded files at this link: https://platform.openai.com/files.
Tip: It's a good idea to delete the file after each time you run your assistant, especially if you're uploading one file each time. Remember, OpenAI allows up to 100GB of files for each organization, with a maximum size limit of 512MB per file
Deleting a File
Step 4: Creating a Thread
The first thing our system needs to do is create a message Thread. This Thread will be the chat interface between the Assistant and the user.
This function returns the Thread object, which includes some metadata such as the thread's ID. We will use this ID to run the thread. This typically occurs once per session or when the user restarts the chat.
Step 5: Adding Messages to a Thread
Now that we have both our Thread ID and File ID, we can create a message and add it to our thread.
Note that the thread and file IDs are used as parameters in our message creation function. We have the option to attach more than one file if necessary.
Step 6: Running the Thread
When you have all the context you need from your user in the Thread, you can run the Thread with an Assistant. By default, a Run will use the model and tools configuration specified for our Assistant (model, tools, etc.), but we can override most of these when creating the Run for added flexibility. Since our assistant was created specifically for our use case, we won’t be changing the configuration.
Below the code to run the Thread and print the results:
Important points to note:
- We can give extra instructions to our assistant when executing a thread. This is helpful if we need to provide specific directions based on the user's request. It's particularly useful when dealing with multiple user message requests where including all instructions in the initial Assistant creation is challenging.
- Once we initiate the run creation method, it's important to monitor the execution status. Run objects can have various statuses:
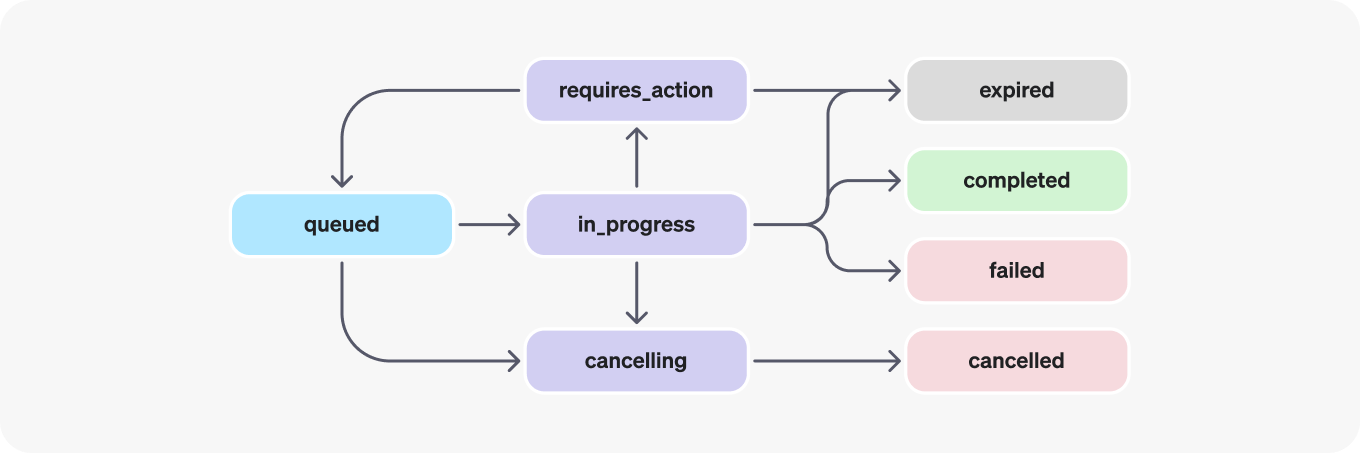
We need to continually check the status of our request until it reaches one of the four final statuses, ideally 'completed.'
- Finally, we should display the initial message from our user and the last message from our Assistant. We focus on the last message (index = 0) because, similar to ChatGPT, our assistant might generate multiple messages before arriving at a final answer due to its self-resolving process.
Congratulations!
You've just embarked on an exciting journey by creating your own AI assistant. But this is merely the starting point. Harnessing the dynamic capabilities of artificial intelligence, you now have the tools to effortlessly automate insights and analyze campaigns in mere minutes. Say goodbye to the tedious task of manually sifting through extensive files and data. Simply upload your files to your custom assistant, pose your queries, and receive precise, tailored results. Imagine the convenience of having a fresh, insightful report delivered daily to your doorstep. Embrace the future of efficient, AI-driven data analysis, and watch as your productivity and insights soar to new heights!


Similar posts
Read more posts from the same author!


Start your 30-day free trial
Never miss a metric that matters.


No credit card required
Cancel anytime
© 2023 Baresquare | All rights reserved.


